Page 1 of 3
Miniature Painting Show-Off Thread
Posted: Tue Dec 19, 2006 8:30 pm
by Blackhawk
This thread serves two purposes. The first is photography hints, if anybody has them, for photographing gaming miniatures. The second is to encourage people to post pictures of their own.
I just dug mine out of storage, where they've been sitting for about nine years now. I'm looking for a creative outlet, and miniature painting used to be my passion. I'm not sure whether I'm going to dive back into the hobby or not, but I thought I'd photograph some of them while I had them out - hence this thread.
So, if anybody has any good tips for closeup photography with a digital camera, let fly. If not, post some pictures of your work. If not, this thread will be yet another Blackhawk thread that ends up on page two with three replies.
Posted: Tue Dec 19, 2006 8:46 pm
by LawBeefaroni
Bump.
Wait, this is Gaming in General.
Anyway, use your macro setting and
this link and
this oneare about all I can offer.
Posted: Tue Dec 19, 2006 9:41 pm
by Byrns
I'm sure you can find lots of tips at
www.coolminiornot.com
Posted: Tue Dec 19, 2006 11:54 pm
by Kadoth Nodens
Posted: Wed Dec 20, 2006 12:35 am
by Fretmute

I've never liked the banner, yet I've never taken it off.
The one that I'll never finish:

Posted: Wed Dec 20, 2006 1:31 am
by Blackhawk
Ouch. Thumbing through their gallery is depressing.
Fretmute - I love the colors. I've always wanted to paint some 40k stuff, but never had the money to add another range to my hobby. Now that I'll be painting individual pieces rather than painting to game, I may have that option.
I took a few shots tonight, but I didn't have very good light, so a lot of detail got lost. I'll try to work on something better tomorrow. They really need cleaned off - nine years of storage will do that to a miniature. I've also found that white enamel takes on an ivory tinge after a few years, which is a bit of a problem with my High Elf army (everything is white.) It is really apparent in the unicorn shot, which used to be pure white.


Posted: Wed Dec 20, 2006 2:39 am
by Kelric
I kind of like the aged ivory coloring on that unicorn.
Posted: Wed Dec 20, 2006 11:58 am
by Fretmute
Blackhawk wrote:They really need cleaned off - nine years of storage will do that to a miniature. I've also found that white enamel takes on an ivory tinge after a few years, which is a bit of a problem with my High Elf army (everything is white.) It is really apparent in the unicorn shot, which used to be pure white.
I'm a Citadel Colours fanboy, because, among other things, their paint (or, at least, the paint that I used twelve years ago) holds its color really well. I painted the Swooping Hawk Phoenix Lord when I was 16, and started the other one about two years later.
Posted: Wed Dec 20, 2006 12:02 pm
by Ripstar
When doing close-up photography two things you want to watch are composition and depth of field.
Composition is how you set up a scene to create interest and in this case trick the eye into believing it is seeing a real scene and not a miniature.
Depth of field is simply how much of your scene or figure is in sharp detail.
Your eye works as a point focus machine and therefore everything you look at is sharp. The camera lense doesn't. It works as a plane of focus. This means that where ever you focus your camera it will be sharp at that distance across your scene, but at any other distance from your plane of focus you will start to lose detail.
A lot of this is dictated by the camera you are using. I have used highend film cameras and digitals and also lowend and just about everythng in bewteen.
Since so much variety is available in the camera world , here is a general little summary of tips for both.
Film Camera:
For miniatures, if using a film camera, choice of film is important.
I would want a fim that would pick up the best colour and detail and would go with a slower iso film which alows this detail time to record.
You also want to use a tripod, set your aperture to the the smallest number at least f22 and your exposure time will likely be long. The miniature should be well lighted and don't jar the tripod during long exposures or your miniature will be blurred. The longer the exposure and the smaller the aperature the more will be in focus.
Digital Camera:
If using a digital, the camera usually has the ability of automatically choosing film speed and aperture setting based on the available lighting.
I use a digital camera that has macro capabilities which means the camera is designed to shine in areas of close-up work instead of telephoto. For most digital users find and use the close-up setting on your camera. If you are comfortable using manual setting, experiment and go for it. I f not let the camera do most of the work for you and concentrate on scene set up.
I have found that the digitals I have used have a better depth of field on auto setting than most film cameras do on manual. Go figure, but a wonderful surprise, nevertheless.
Composition:
As for composition. If you are just shooting a miniature by it self to show detail, then just shoot close and big because thats what you want.
For me I prefer to set up a scene that compliments the miniature and photograph it with dramatic lighting.
If the angle of the shot is low Iwill set the scene up outside and use a real background of forest, hills, snow fields etc. to blend into the miniature scene that I am creating.
If my photo angle is high I use dramatic lighting to cast shadows from turreted walls or forest trees to add interest to a scene of mounted knight laboring up a road to a castle at night.
Use grain of wheat bulbs to light castle interiors, they look great.
Buy em from a model rail road store.
If if you are going for realism HIDE THE BASES of your miniatures.
Use a little moss or scenic material sand.
Trick the eye and show the detail is the name
of the game.
Most of all have fun.
Posted: Wed Dec 20, 2006 3:34 pm
by Gato
Don't have any fantasy figurine, here's one from my old Wargaming days.
An ASL(Advanced Squad Leader) piece made by Micro Armor.
To give you an idea of the size, the tank is climbing on a Canadian nickel(same size as the American counterpart)

Posted: Wed Dec 20, 2006 3:56 pm
by Fretmute
Blackhawk wrote:
Ouch. Thumbing through their gallery is depressing.

Well, at least now I know that continuing is pointless.
You paint a fine eye, Blackhawk.
Posted: Wed Dec 20, 2006 6:05 pm
by Blackhawk
Yeah, but there are some stunning tutorials over there. The last time I painted, the internet was still a baby. Anyone have any good links?
Posted: Wed Dec 20, 2006 7:30 pm
by Kelric
I peruse coolminiornot every few months. The one that Fret just posted is probably my favorite. It's a stunning piece of work.
Posted: Thu Dec 21, 2006 3:11 am
by Lee
Ripstar wrote:Film Camera:You also want to use a tripod, set your aperture to the the smallest number at least f22 and your exposure time will likely be long. The miniature should be well lighted and don't jar the tripod during long exposures or your miniature will be blurred. The longer the exposure and the smaller the aperature the more will be in focus.
F22 is a bit small, you lose sharpness at that high of an aperture. Optimal sharpness is usually around F11-13 on SLR lenses. Plus everything you said here applies to digital and film. As a side note most P&S digital cameras only go to f8. Don't go that small, you lose too much light and sharpness in my experience. I wouldn't go above f7.1.
Digital Camera:
If using a digital, the camera usually has the ability of automatically choosing film speed and aperture setting based on the available lighting.
I use a digital camera that has macro capabilities which means the camera is designed to shine in areas of close-up work instead of telephoto. For most digital users find and use the close-up setting on your camera. If you are comfortable using manual setting, experiment and go for it. I f not let the camera do most of the work for you and concentrate on scene set up.
I would not use auto, use aperture priority with a tripod. For a P&S adjust to around 5.6 and take the shot. You cannot do this hand held unless your lighting is professional quality. Your aperture determines how much is in focus, the larger the number the more that is in focus, but like I said above, too big of a number is bad. Also where you aim the focus, 1/3 in front, and 2/3 behind of where you aimed the focus will be in focus. In macro photography the depth of the field is in mere centimeters though (if that), so don't expect a lot here.
Also don't let the camera do auto film speed. You want the lowest ISO you can get if you are tripod shooting. Higher ISOs suck on P&S, you will get tons of noise. On my point in shoot I leave the camera at ISO 50 unless I am desperate for a handheld shot, I go higher.
I have found that the digitals I have used have a better depth of field on auto setting than most film cameras do on manual. Go figure, but a wonderful surprise, nevertheless.
Digital cameras have more depth of field due to the sensor size. The sensor is so small, that it allows it to use very large apertures and everything will still be in focus. So yeah, P&S can be good at macro shooting, but the flashes are so bad, that you need external light.
For really good indoor macro shooting, you need an SLR and a good flash that you can bounce, or professional lighting. If you don't have that. I recommend putting your subject directly under a light, put the camera in macro mode, and zoom in a bit. If you don't zoom in, things will curve, but at the same time you get less depth of field if you zoom in. It will take some practice. Shoot in Aperture priority (Av on a Canon I believe) and start at about F5.6 and then adjust accordingly.
Quick depth of field explanation: The closer you are to the subject, the less DoF. The more you zoom in, the less DoF. But at wide angle, things curve, and you will notice it on a miniature (the sword will look bent). The smaller the aperture, f#, the less DoF. So if you aren't capturing enough of the miniature in focus, pull the camera back, don't zoom in so much, or move the aperture to a bigger number.
Posted: Thu Dec 21, 2006 10:33 am
by Bob
This is probably already covered in one of those tutorials but my photo tricks are:
1. A tripod.
2. Lots of lighting.
3. Use the timer on the camera instead of pushing the button. (that way there is no camera movement at all.)
Posted: Thu Dec 21, 2006 10:40 am
by Bob
Posted: Thu Dec 21, 2006 4:44 pm
by Blackhawk
Wow, those turned out really well - that second stormtrooper is really well posed. I've taken a few more that I'm getting ready to upload now.
Posted: Thu Dec 21, 2006 5:14 pm
by Blackhawk
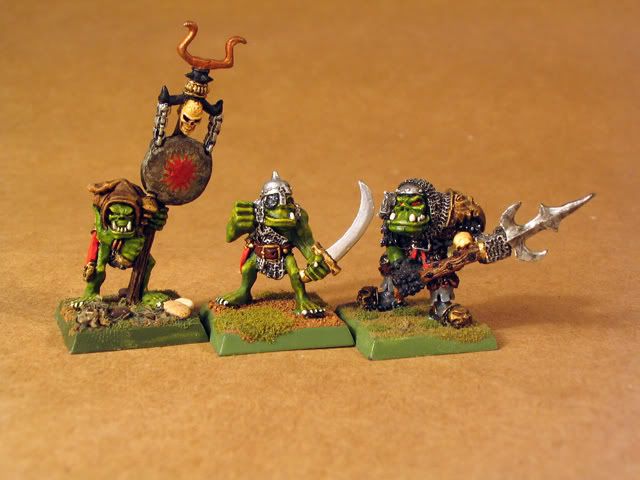
I've been fiddling with photography some more. At some point I took my best dozen or so miniatures out of the regular boxes to display, and I have no idea where they got repacked, so some of these are in a half-finished state. There are lots of missing shields, unfinished bases, and so on.
Orc command group:
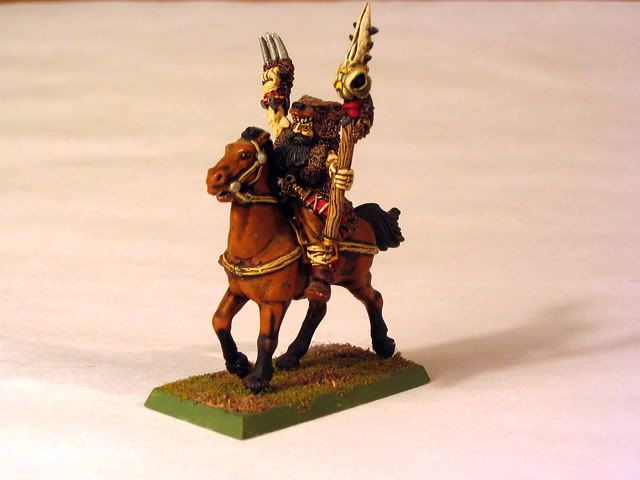
A mounted nature mage:
Minotaur:

A unit of High Elf spearmen. As you can see, I still don't have the shields done.
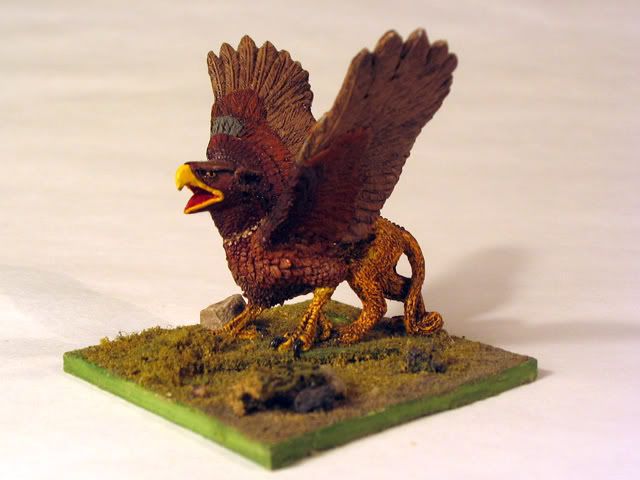
Griffon:
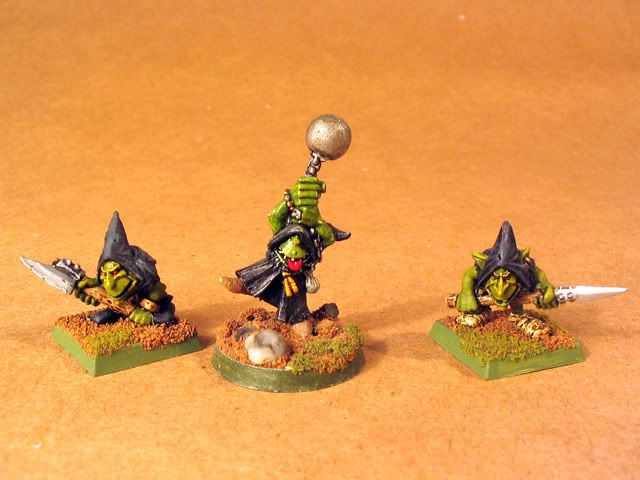
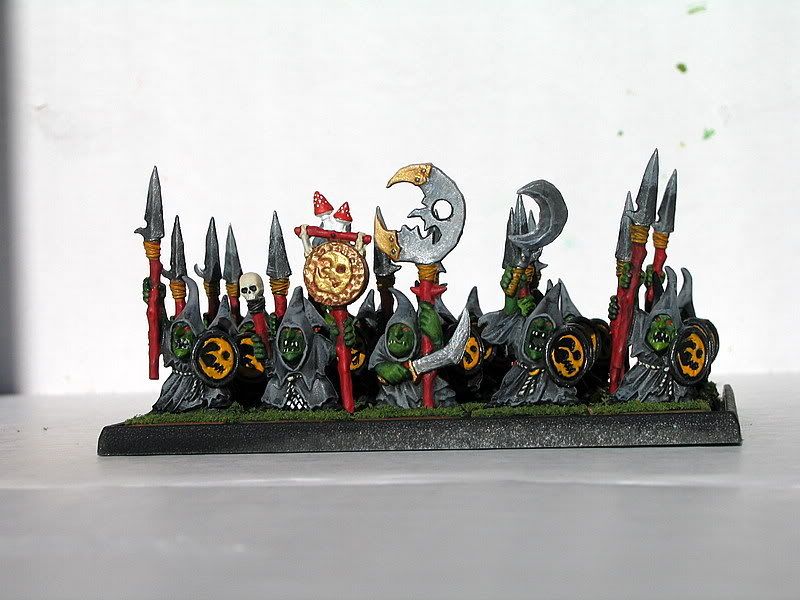
Night Goblins:
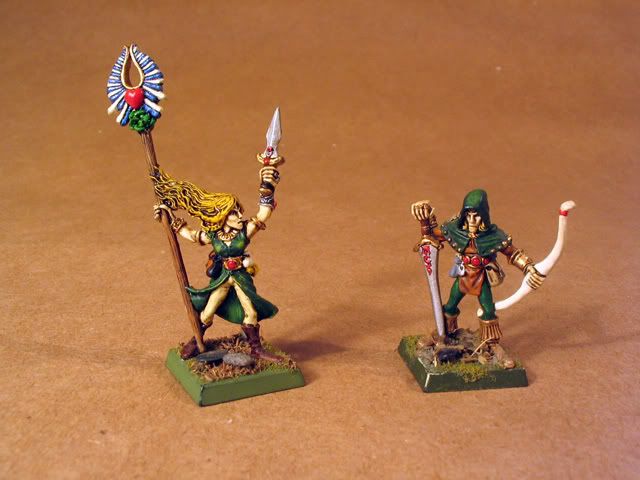
Wood Elf heroes:
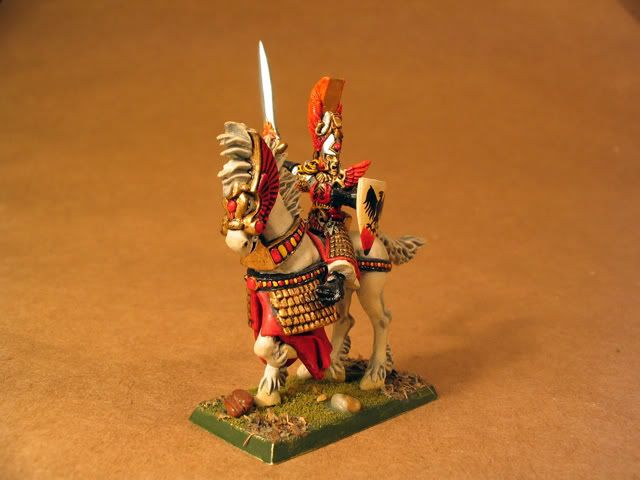
A High Elf general - Tyrian? Tynian? Something like that:
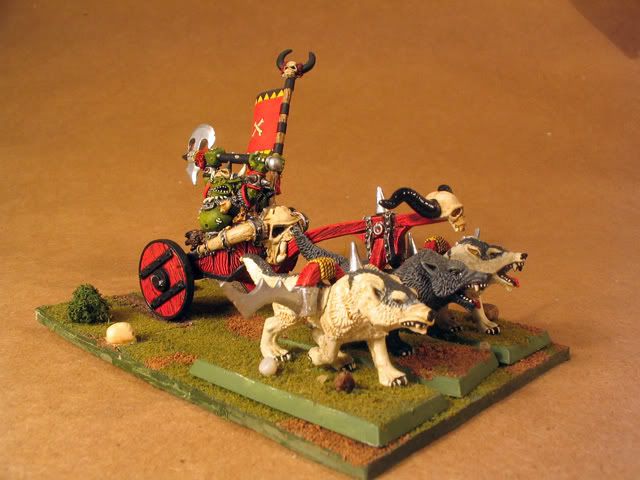
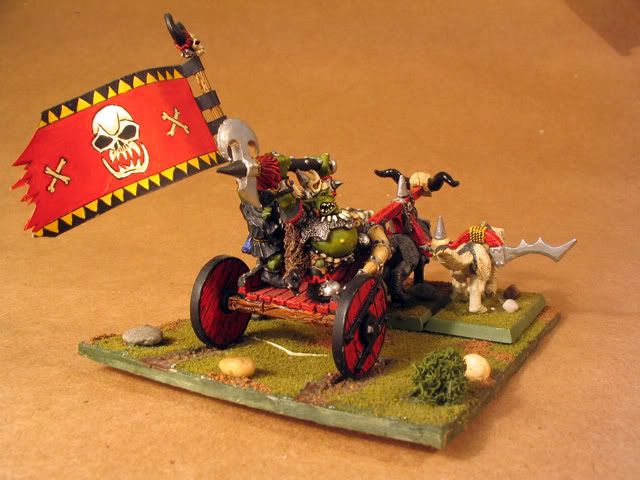
Goblin general's chariot, two shots:
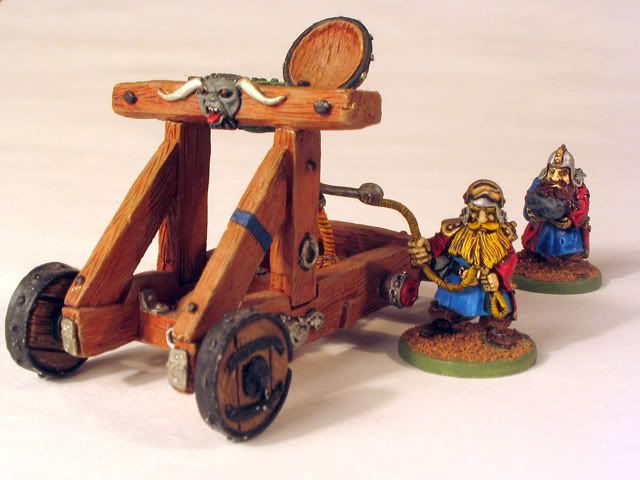
Dwarven catapult:
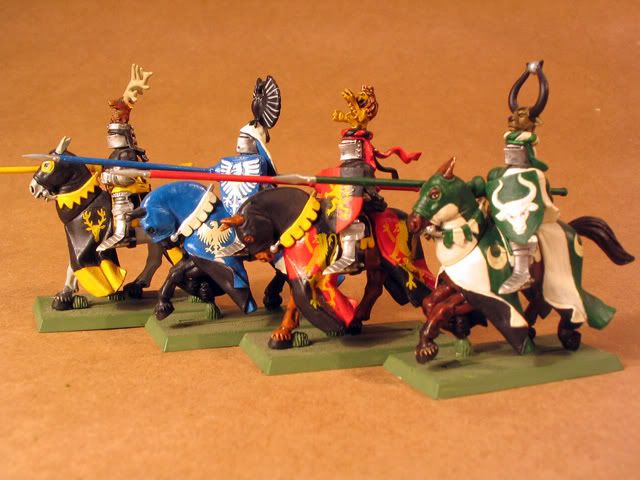
Half-finished Brettonian knights. The bases aren't done, the shading isn't done, and one shield is missing:
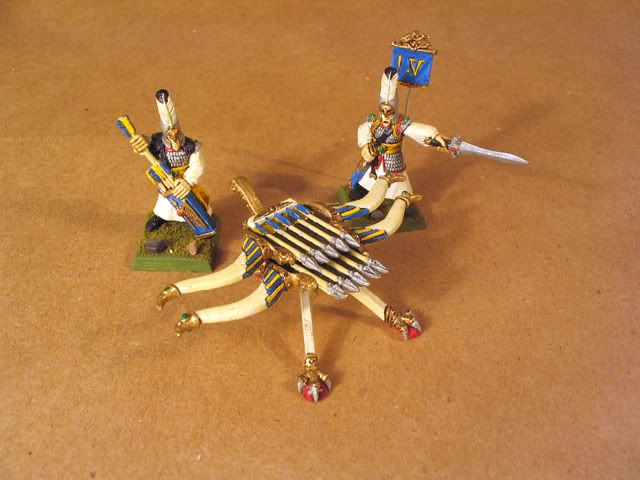
High Elf ballista:
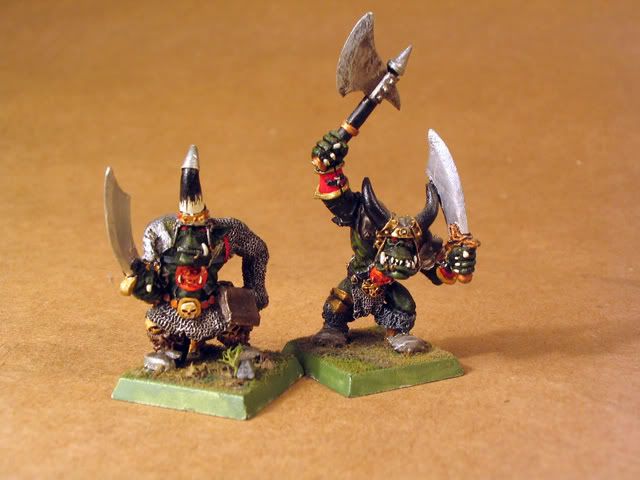
Black orcs:
This last one has a point to it. There was a Milton-Bradley type boardgame in the early 90s that had a distinctly Warhammer flavor to it (there may have been some sort of tie-in.) I don't remember the name (Battlemaster, maybe?,) but it came with dozens upon dozens of cheap plastic miniatures. Chaos, orcs, goblin, and Empire, as I recall. It sold poorly, and Toys 'R' Us dumped them all for five bucks apiece. I bought like three sets. While the miniatures weren't comparable to well-sculpted pewter pieces, with careful painting they could certainly be used to fill out an army, especially if you bought regular pewter heroes for the units. When Games Workshop minis were running $7 each, I was able to field entire 3,000 point Orc/Goblin, Chaos, and Empire armies for $15 total. The shot below is a unit of goblins in which all of the rank and file troops are those cheap plastic miniatures:

Posted: Thu Dec 21, 2006 5:44 pm
by Dirt
Heroquest.
Posted: Thu Dec 21, 2006 5:56 pm
by hentzau
No, he had it right. Battlemaster. Fun beer and pretzels game.
Posted: Thu Dec 21, 2006 6:00 pm
by Kadoth Nodens
That Gobbo chariot is great! Love the multi-color wolves.
Posted: Thu Dec 21, 2006 6:24 pm
by Dirt
Battlemaster was an on-line game. Heroquest was a boardgame.
Posted: Thu Dec 21, 2006 6:46 pm
by Blackhawk
They aren't Heroquest miniatures. I have Heroquest miniatures. Those aren't they. This came with a huge roll-out plastic mat with four-inch-wide hexes and terrain on it.
Posted: Thu Dec 21, 2006 6:52 pm
by Blackhawk
Battle Masters, with a space.

Posted: Thu Dec 21, 2006 7:15 pm
by dbt1949
I still have that from many years ago. All the pieces are painted up but I don't have the box anymore.
Posted: Sat Jan 20, 2007 4:58 pm
by helot2000
Thanks to you guys here and in GT forums, these are a few pics of the Warhammer army my son and I have been working on. I shot a ton of pics but most didn't turn out. I need to sink some time and energy into getting mini photography right.
This is our first crack at painting Warhammer. I painted ACW minis when I was 16 but that was, um, a very long time ago. I really like the drybrushing technique and the results so far. Definately a huge improvement over my ACW armies. So far, we've almost finished my son's BFSP Goblin army. Then onto the Dwarves and their beards...
OK, my problem with posting the pictures has been fixed thanks to the tips below. I was using a Picasa photo album and while it provided an URL link, I couldn't get the IMG code. Thanks for the help!
Posted: Sat Jan 20, 2007 5:31 pm
by Biyobi
helot, I think phpBB may have a problem with the '#' symbol in the link.

Posted: Sat Jan 20, 2007 7:48 pm
by Blackhawk
Biyobi wrote:helot, I think phpBB may have a problem with the '#' symbol in the link.
...or with the fact that the links aren't actually images.
Posted: Sat Jan 20, 2007 7:55 pm
by Grifman
What a geeky thread . . .

Posted: Sat Jan 20, 2007 8:03 pm
by Blackhawk
Grifman wrote:What a geeky thread . . .
...says a man in a gaming forum.
Posted: Sat Jan 20, 2007 8:08 pm
by Quipp
helot2000 wrote:Hmmm, that didn't turned out right. Apparently, I need a tip for posting a pic in this forum and then I need to go back to photography. I scanned the forum for instructions but there must be something I'm missing. Help!
Image tags only work if you are hotlinking to a page with the actual .jpg, .gif, or other image file. To do this with Picasa right-click on your image in Picasa, select properties and copy the Location address of your image. Then subtract any information past the image format and put what's left inside of the IMG tags.
for example right-clicking your first image gives this under address under Location:
http://lh3.google.com/image/helot2000/R ... imgmax=720
Removing the
?imgmax=720 at the end and surrounding what's left with IMG tags outputs this:
(edit: Hmm, the image is not consistently showing itself for me now. Picasa may not like hotlinking.)

If the above seems like too much hassle, you can always just link directly to the image's web address:
http://picasaweb.google.com/helot2000/P ... 9675939170
Or take the address above and using the format
web address][/i]any description you want create a selection url that looks something like this:
Image 1
Posted: Sat Jan 20, 2007 11:44 pm
by helot2000
Grifman wrote:What a geeky thread . . .
C'mon. Embrace your inner Geek!
My Saturday night features the PC game "Defending the Reich." How many pretenders to the "Throne of Geek" are spending tonight sorting out Gruppens of HE-219s Uhls, JU-88s and ME-110s? If you know the difference between the Tame Boars and Wild Boar night fighters, then you Sir, can have my crown. (but only for tonight).
And thanks Quipp. You cleared up my problem with a nice response.
Posted: Sun Jan 21, 2007 12:59 pm
by Roscoe
helot2000 wrote:Grifman wrote:What a geeky thread . . .
C'mon. Embrace your inner Geek!
My Saturday night features the PC game "Defending the Reich." How many pretenders to the "Throne of Geek" are spending tonight sorting out Gruppens of HE-219s Uhls, JU-88s and ME-110s? If you know the difference between the Tame Boars and Wild Boar night fighters, then you Sir, can have my crown. (but only for tonight).
And thanks Quipp. You cleared up my problem with a nice response.
Tame Boar versus Wild Boar? Easy. Tame Boar (
Zahme Sau) were night fighters under GCI (ground control intercept) direction, usually up to the point when the aircraft's own radar could take control. Wild Boar (
Wilde Sau) were usually day fighters with rudimentary night fighter add-ons. Ground Control would sent them to the general area and then they would hunt the bombers as they were illuminated by the searchlights, the moon or even fires on the ground.
Sure, I could have looked this up in the internet, but I also am a geek player of wargames, not to mention I own at least a half-dozen books about nightfighers; feel free to ask for a reference!

Posted: Sun Jan 21, 2007 1:21 pm
by helot2000
Crown conceded and a quick, off-topic recommendation. For a fellow WW II Night Bombing campaign Grog, I recommend HPS Simulations "Defending the Reich." It is a good game and and at $24, a good value. I played it late into the night and first thing in the AM.
If you were to buy a copy for yourself, I'd be up for a head to head game. I don't know that we could finish all 44 turns that constitutes a game but I'd like to try out my rookie skills against a human.
When I get some time this week, I'll to put a proper review in the proper place-PC gaming thread.
Back to Mini Photos...
Posted: Sat Sep 22, 2007 6:17 pm
by helot2000
My son and I have been painting a Dwarf army and an Orc & Goblin army since last November. We finished the Battle for Skull Pass gobos and bogged down on the Dwarves. After a hiatus, we started back up this summer and finished the Dwarves. Now we're working on the Orc and Goblin Battalion box and try to do a session every week.
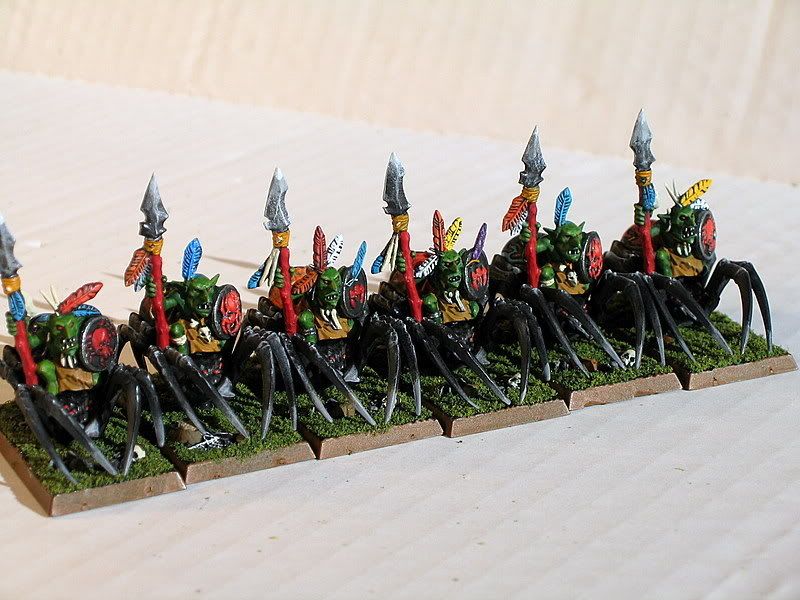
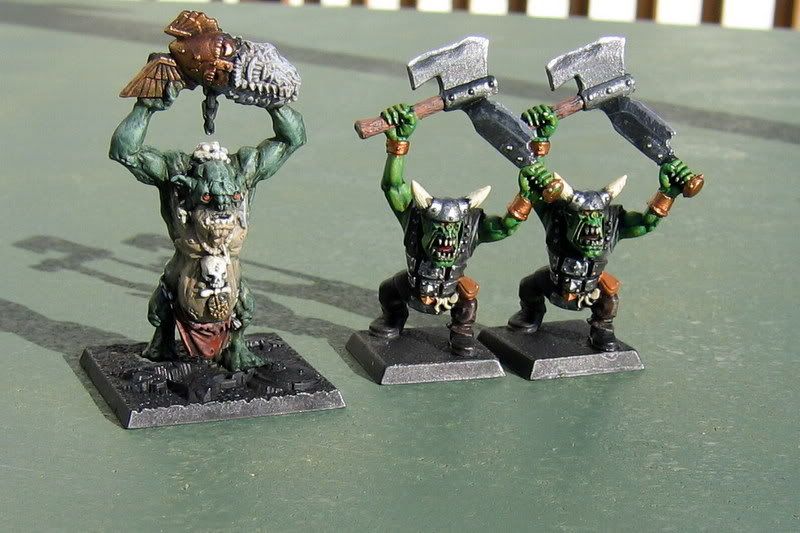
I suck at shooting mini photos but here's our work in progress. I'll start with a troll that my 12 year old son finished by himself while I was working on the Orc chariot. He is the detail guy but has now surpassed me as he masters the techniques.
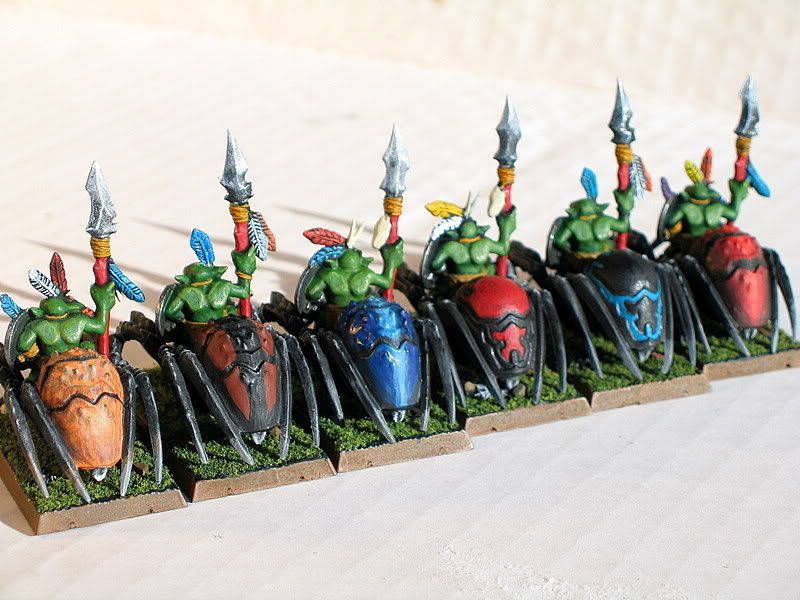
The Goblin Wolf Riders are very time consuming but they are on their way to being the best looking unit yet. Not quite finished as you may notice but the sun was bright and so I shot a few poor quality pics.
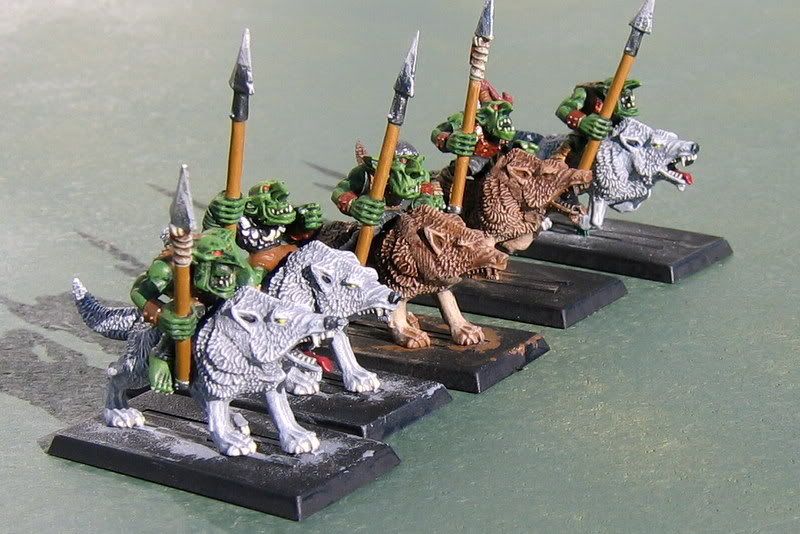
For his birthday, my son wants a Giant and some Ironbreakers. We really should play the figures more but right now, we sink our free time into painting. I have to post here because only fellow WHers understand how time consuming it is to field a painted army. We're getting there!

Posted: Sat Sep 22, 2007 6:38 pm
by Quipp
Nice work! Your son definitely has much better technique and eye for detail than I did when I was painting minis at age 12.
Posted: Sat Sep 22, 2007 8:00 pm
by helot2000
We've benefited from the Internet and forums like this one. When I painted American Civil War minis years ago, I painted carefully but with no techniques. A year ago, I didn't know what drybrushing, inking or blending was. Thanks to members here who first posted about the Battle for Skull Pass deal, Warhammer in general, pics of their minis and tips including how to paint Dwarf Beards, we were able to come out of the gates as noobs and paint at a decent level.
Early on, I printed tips, instructions and pictures I found on line. I'd experiment and through trial and error, figure out how to do the basic techniques. My son watch and learned and of course, has lapped me.
Probably the next step would be to go to The Source or some other gaming store and sit for a few painting session with master painters to shake out our basic understanding of these techniques. The armies we're painting are his so ultimately, I defer to his judgment on assembly, colors and such. One of his friends is pretty taken with Warhammer so the hobby keeps on spreading.
Posted: Sat Sep 22, 2007 11:18 pm
by Kasey Chang
I thought I saw one of those "eBay photo kits / mini-studio" things in either Walgreens or CompUSA. Basically it's a white sheet of plastic that has two holders so you get a perfectly neutral background and little shadow if at all if you use the right lighting, and can be easily setup on a desktop.
Posted: Sun Sep 23, 2007 12:05 am
by helot2000
Kasey Chang wrote:I thought I saw one of those "eBay photo kits / mini-studio" things in either Walgreens or CompUSA. Basically it's a white sheet of plastic that has two holders so you get a perfectly neutral background and little shadow if at all if you use the right lighting, and can be easily setup on a desktop.
I would be willing to buy this rather than make one on my own. How embarrassing...I was reading this thread from the beginning and I noticed in Jan. I said I'd spend some time improving my mini photography skills. I haven't done so but a photo box and some lights would sure help. Thanks for the tip. I'll be on the lookout for it (or buy it on-line).
Posted: Sun Sep 23, 2007 3:22 am
by LawBeefaroni
helot2000 wrote:
Great models, but I think they're offsides.


